This site contains the documentation that is relevant to older WSO2 product versions and offerings.
For the latest WSO2 documentation, go to https://wso2.com/documentation/.
Routing Slip
This section explains, through an example scenario, how the Routing Slip EIP can be implemented using WSO2 ESB. The following topics are covered:
Introduction to Routing Slip
The Routing Slip EIP routes a message consecutively through a series of processing steps when the sequence of steps is not known at design-time, and may vary for each message. For more information, refer to http://www.eaipatterns.com/RoutingTable.html.
Figure 1: Routing Slip EIP
The sequence in which a message should process usually varies based on the request that arrives. This EIP observes the message at the initial state and attaches a specific list of steps that the message should follow.
Example scenario
In the example scenario, when the ESB receives a message, it will attach a property to the message using the Header mediator to indicate the set of processors that it should follow. It defines each process as a separate sequence. This example consists of three independent sequences. The attached properties are processed using the Iterate mediator, and the process is analyzed using the Switch mediator in each iteration cycle. Once the process is analyzed, the message will be sent to the respective process (sequence).
The diagram below depicts how to simulate the example scenario using WSO2 ESB.
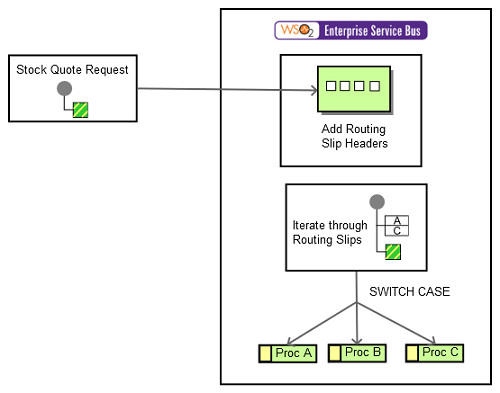
Figure 2: Routing Slip Example Scenario
Before digging into implementation details, let's take a look at the relationship between the example scenario and the Routing Slip EIP by comparing their core components.
| Routing Slip EIP (Figure 1) | Routing Slip Example Scenario (Figure 2) |
|---|---|
| Request Message | Simple Stock Quote Request |
| Routing Slip | Header Mediator appends node to SOAP header |
| Proc A/B/C | Sequence |
Environment setup
- Download and install WSO2 ESB from http://wso2.com/products/enterprise-service-bus. For a list of prerequisites and step-by-step installation instructions, refer to Installation Guide in the WSO2 ESB documentation.
- Start the sample Axis2 server instances. For instructions, refer to the section Setting Up the ESB Samples - Starting the Axis2 server in the WSO2 ESB documentation.
ESB configuration
Start the ESB server and log into its management console UI (https: //localhost:9443/carbon
). In the management console, navigate to the Main menu and click Source View in the Service Bus section . Next, copy and paste the following configuration, which helps you explore the example scenario, to the source view.
<definitions xmlns="http://ws.apache.org/ns/synapse">
<proxy name="RoutingSlipProxy" transports="http https" startOnLoad="true">
<target>
<inSequence>
<!-- Will Attach The Routing Slip -->
<header xmlns:m1="http://services.samples"
name="m1:RoutingSlip"
value="Process_A"/>
<header xmlns:m1="http://services.samples"
name="m1:RoutingSlip"
value="Process_C"/>
<log level="full"/>
<!-- Will Perform All The Steps Based on The Slip -->
<iterate xmlns:m0="http://services.samples"
preservePayload="true"
expression="//m0:RoutingSlip">
<target>
<sequence>
<switch xmlns:m2="http://services.samples" source="//m2:RoutingSlip">
<case regex="Process_A">
<sequence key="process_a"/>
</case>
<case regex="Process_B">
<sequence key="process_b"/>
</case>
<case regex="Process_C">
<sequence key="process_c"/>
</case>
<default>
<drop/>
</default>
</switch>
</sequence>
</target>
</iterate>
</inSequence>
<outSequence>
<drop/>
</outSequence>
</target>
</proxy>
<sequence name="process_b">
<log level="custom">
<property name="Process" value="B"/>
</log>
</sequence>
<sequence name="process_c">
<log level="custom">
<property name="Process" value="C"/>
</log>
</sequence>
<sequence name="process_a">
<log level="custom">
<property name="Process" value="A"/>
</log>
<sequence key="send_seq"/>
</sequence>
<sequence name="fault">
<log level="full">
<property name="MESSAGE" value="Executing default "fault" sequence"/>
<property name="ERROR_CODE" expression="get-property('ERROR_CODE')"/>
<property name="ERROR_MESSAGE" expression="get-property('ERROR_MESSAGE')"/>
</log>
<drop/>
</sequence>
<sequence name="send_seq">
<send>
<endpoint name="simple">
<address uri="http://localhost:9000/services/SimpleStockQuoteService"/>
</endpoint>
</send>
</sequence>
<sequence name="main">
<log/>
<in/>
<out/>
</sequence>
</definitions>
Simulating the sample scenario
- Send a request like the following to the client.
ant stockquote -Dtrpurl=http://localhost:8280/services/RoutingSlipProxy -Dsymbol=foo
- Note that the steps are attached to the message header initially. Thereafter, processing will be decided based on the attached slip. You can observe process A and process C being logged in the ESB management console.
You can also allow the message to flow through Process B by indicating a header in the following manner.
<header xmlns:m1="http://services.samples"
                    name="m1:RoutingSlip"
                    value="Process_B"/>
If you add the above header at the beginning, you will notice the message going through Process B as well.
How the implementation works
Let's investigate the elements of the ESB configuration in detail. The line numbers below are mapped with the ESB configuration shown above.
- header [line 7 in ESB config] - The Header mediator appends a key/value pair to the SOAP header. It can be used to remove such pairs. In this example, the configuration adds a header field called
RoutingSlipwith a value of Process A. It then adds another header fieldRoutingSlipwith a value of Process C. - iterate [line 15 in ESB config] - The Iterate mediator is used to iterate over all
RoutingSlipnodes inside the header. - switch [line 20 in ESB config] - The Switch mediator is used to filter out and match the value in
RoutingSlipto run the relevant sequence.