Enterprise Integration Patterns
Polling Consumer
This section explains, through an example scenario, how the Polling Consumer EIP can be implemented using WSO2 ESB. The following topics are covered:
Introduction to Polling Consumer
The Polling Consumer EIP allows the ESB to explicitly make a call when the application wants to receive a message. For more information, refer to http://www.eaipatterns.com/PollingConsumer.html.
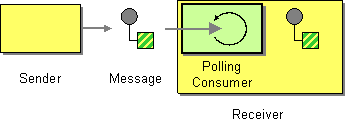
Figure 1: Polling Consumer EIP
Example scenario
This example scenario demonstrates the WSO2 ESB JMS proxy, which is a polling transport that is used to connect to various JMS providers. After configuring the JMS proxy, it will listen on a queue on the JMS server. Next, we send a message to the queue, and the JMS proxy in the ESB will pick up the message when it is ready for consumption.
The diagram below depicts how to simulate the example scenario using WSO2 ESB.
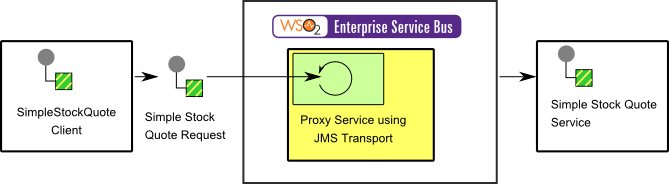
Figure 2: Example Scenario of the Polling Consumer EIP
Before digging into implementation details, let's take a look at the relationship between the example scenario and the Polling Consumer EIP by comparing their core components.
| Polling Consumer EIP (Figure 1) | Polling Consumer Example Scenario (Figure 2) |
|---|---|
| Sender | Simple Stock Quote Client |
| Message | Simple Stock Quote Request |
| Polling Consumer | Proxy Service using JMS Transport |
| Receiver | Simple Stock Quote Service |
Environment setup
- Download and install WSO2 ESB from http://wso2.com/products/enterprise-service-bus. For a list of prerequisites and step-by-step installation instructions, refer to Installation Guide in the WSO2 ESB documentation.
- Download and install a JMS server. We use ActiveMQ as the JMS provider in this example.
- Make the following edits to the
<ESB_HOME>/repository/conf/axis2/axis2.xmlfile.- To enable the JMS transport, uncomment the Axis2 transport listener configuration for ActiveMQ as follows:
<transportReceiver name="jms" class="org.apache.axis2.transport.jms.JMSListener">...
Set the
transport.jms.SessionTransactedparameter to true. After making this update, thetransportReceiversection ofaxis2.xmlshould appear as follows:<transportReceiver name="jms" class="org.apache.axis2.transport.jms.JMSListener"> <parameter name="myQueueConnectionFactory" locked="false"> <parameter name="java.naming.factory.initial" locked="false">org.apache.activemq.jndi.ActiveMQInitialContextFactory</parameter> <parameter name="java.naming.provider.url" locked="false">tcp://localhost:61616</parameter> <parameter name="transport.jms.ConnectionFactoryJNDIName" locked="false">QueueConnectionFactory</parameter> <parameter name="transport.jms.ConnectionFactoryType" locked="false">queue</parameter> <parameter name="transport.jms.SessionTransacted">true</parameter> </parameter> <parameter name="default" locked="false"> <parameter name="java.naming.factory.initial" locked="false">org.apache.activemq.jndi.ActiveMQInitialContextFactory</parameter> <parameter name="java.naming.provider.url" locked="false">tcp://localhost:61616</parameter> <parameter name="transport.jms.ConnectionFactoryJNDIName" locked="false">QueueConnectionFactory</parameter> <parameter name="transport.jms.ConnectionFactoryType" locked="false">queue</parameter> <parameter name="transport.jms.SessionTransacted">true</parameter> </parameter> </transportReceiver>
- Uncomment the Axis2 transport sender configuration as follows:
<transportSender name="jms" class="org.apache.axis2.transport.jms.JMSSender"/>
- To enable the JMS transport, uncomment the Axis2 transport listener configuration for ActiveMQ as follows:
- Copy the following ActiveMQ client JAR files to the
<ESB_HOME>/repository/components/libdirectory to allow the ESB to connect to the JMS provider.activemq-core-5.2.0.jargeronimo-j2ee-management_1.0_spec-1.0.jar
- Add a custom mediator called
MessageCounterMediator. Download theMessageCounterMediatorfile, and save it in the<ESB_HOME>/repository/components/libfolder. To learn how to write custom mediators, refer to Writing Custom Mediator Implementations in the WSO2 ESB documentation. - Start ActiveMQ (or equivalent JMS Server) and WSO2 ESB.
- Start the sample Axis2 server. For instructions, refer to the section Setting Up the ESB Samples - Starting the Axis2 server in the WSO2 ESB documentation.
ESB configuration
Log into the ESB's management console UI (https://localhost:9443/carbon), and navigate to the Main menu and click Source View in the Service Bus section. Next, copy and paste the following configuration, which helps you explore the example scenario, to the source view.
<definitions xmlns="http://ws.apache.org/ns/synapse">
    <proxy name="StockQuoteProxy" transports="jms">
        <target>
            <inSequence>
                <property action="set" name="OUT_ONLY" value="true"/>
            </inSequence>
            <endpoint>
                <address uri="http://localhost:9000/services/SimpleStockQuoteService"/>
            </endpoint>
            <outSequence>
                <send/>
            </outSequence>
        </target>
        <publishWSDL uri="file:repository/samples/resources/proxy/sample_proxy_1.wsdl"/>
        <parameter name="transport.jms.ContentType">
            <rules>
                <jmsProperty>contentType</jmsProperty>
                <default>application/xml</default>
            </rules>
        </parameter>
    </proxy>
</definitions>
Simulating the sample scenario
- Send a stock quote request on JMS, as follows:
ant jmsclient -Djms_type=pox -Djms_dest=dynamicQueues/StockQuoteProxy -Djms_payload=MSFT
- Note a message on the console running the sample Axis2 server saying that the server has accepted an order. For example:
Accepted order #1 for : 17718 stocks of MSFT at $ 79.83113379282025
Also note that there is one message queued and one de-queued in the queue created in the ActiveMQ web console athttp://localhost:8161/admin/queues.jsp. - Next, stop the ESB server, and send a stock quote request again. In the ActiveMQ web console, you can see that there are two messages queued and only one message de-queued.
- Start the ESB server again, and view the console running the sample Axis2 server. You will see a message indicating that the server has accepted the second message.
How the implementation works
Let's investigate the elements of the ESB configuration in detail. The line numbers below are mapped with the ESB configuration shown above.
- proxy [line 2 in ESB config] - A proxy service with a JMS transport.
- parameter [line 15 in ESB config] - Sets JMS transport parameter
contentTypeto application/xml.