This site contains the documentation that is relevant to older WSO2 product versions and offerings.
For the latest WSO2 documentation, go to https://wso2.com/documentation/.
WSO2 API Microgateway for WSO2 Open Banking
The WSO2 API Microgateway is a lightweight message processor for APIs. The API Microgateway is used for message security, transport security, routing, and other common API Management related quality of services. It can process incoming and outgoing messages while collecting information required for usage metering and throttling capabilities. The API Microgateway natively supports scaling in highly decentralized environments including microservice architecture. An immutable, ephemeral Microgateway fits well with the microservice architecture.
Setting up API Microgateways close to your backend servers and on-premise deployments not only reduces network latency but also adds additional security as you can run it in a fully controlled environment with a selected set of APIs. You can run the API Microgateway in a regional data centre, in the same server instance as your service implementation, or even in your local workstation.
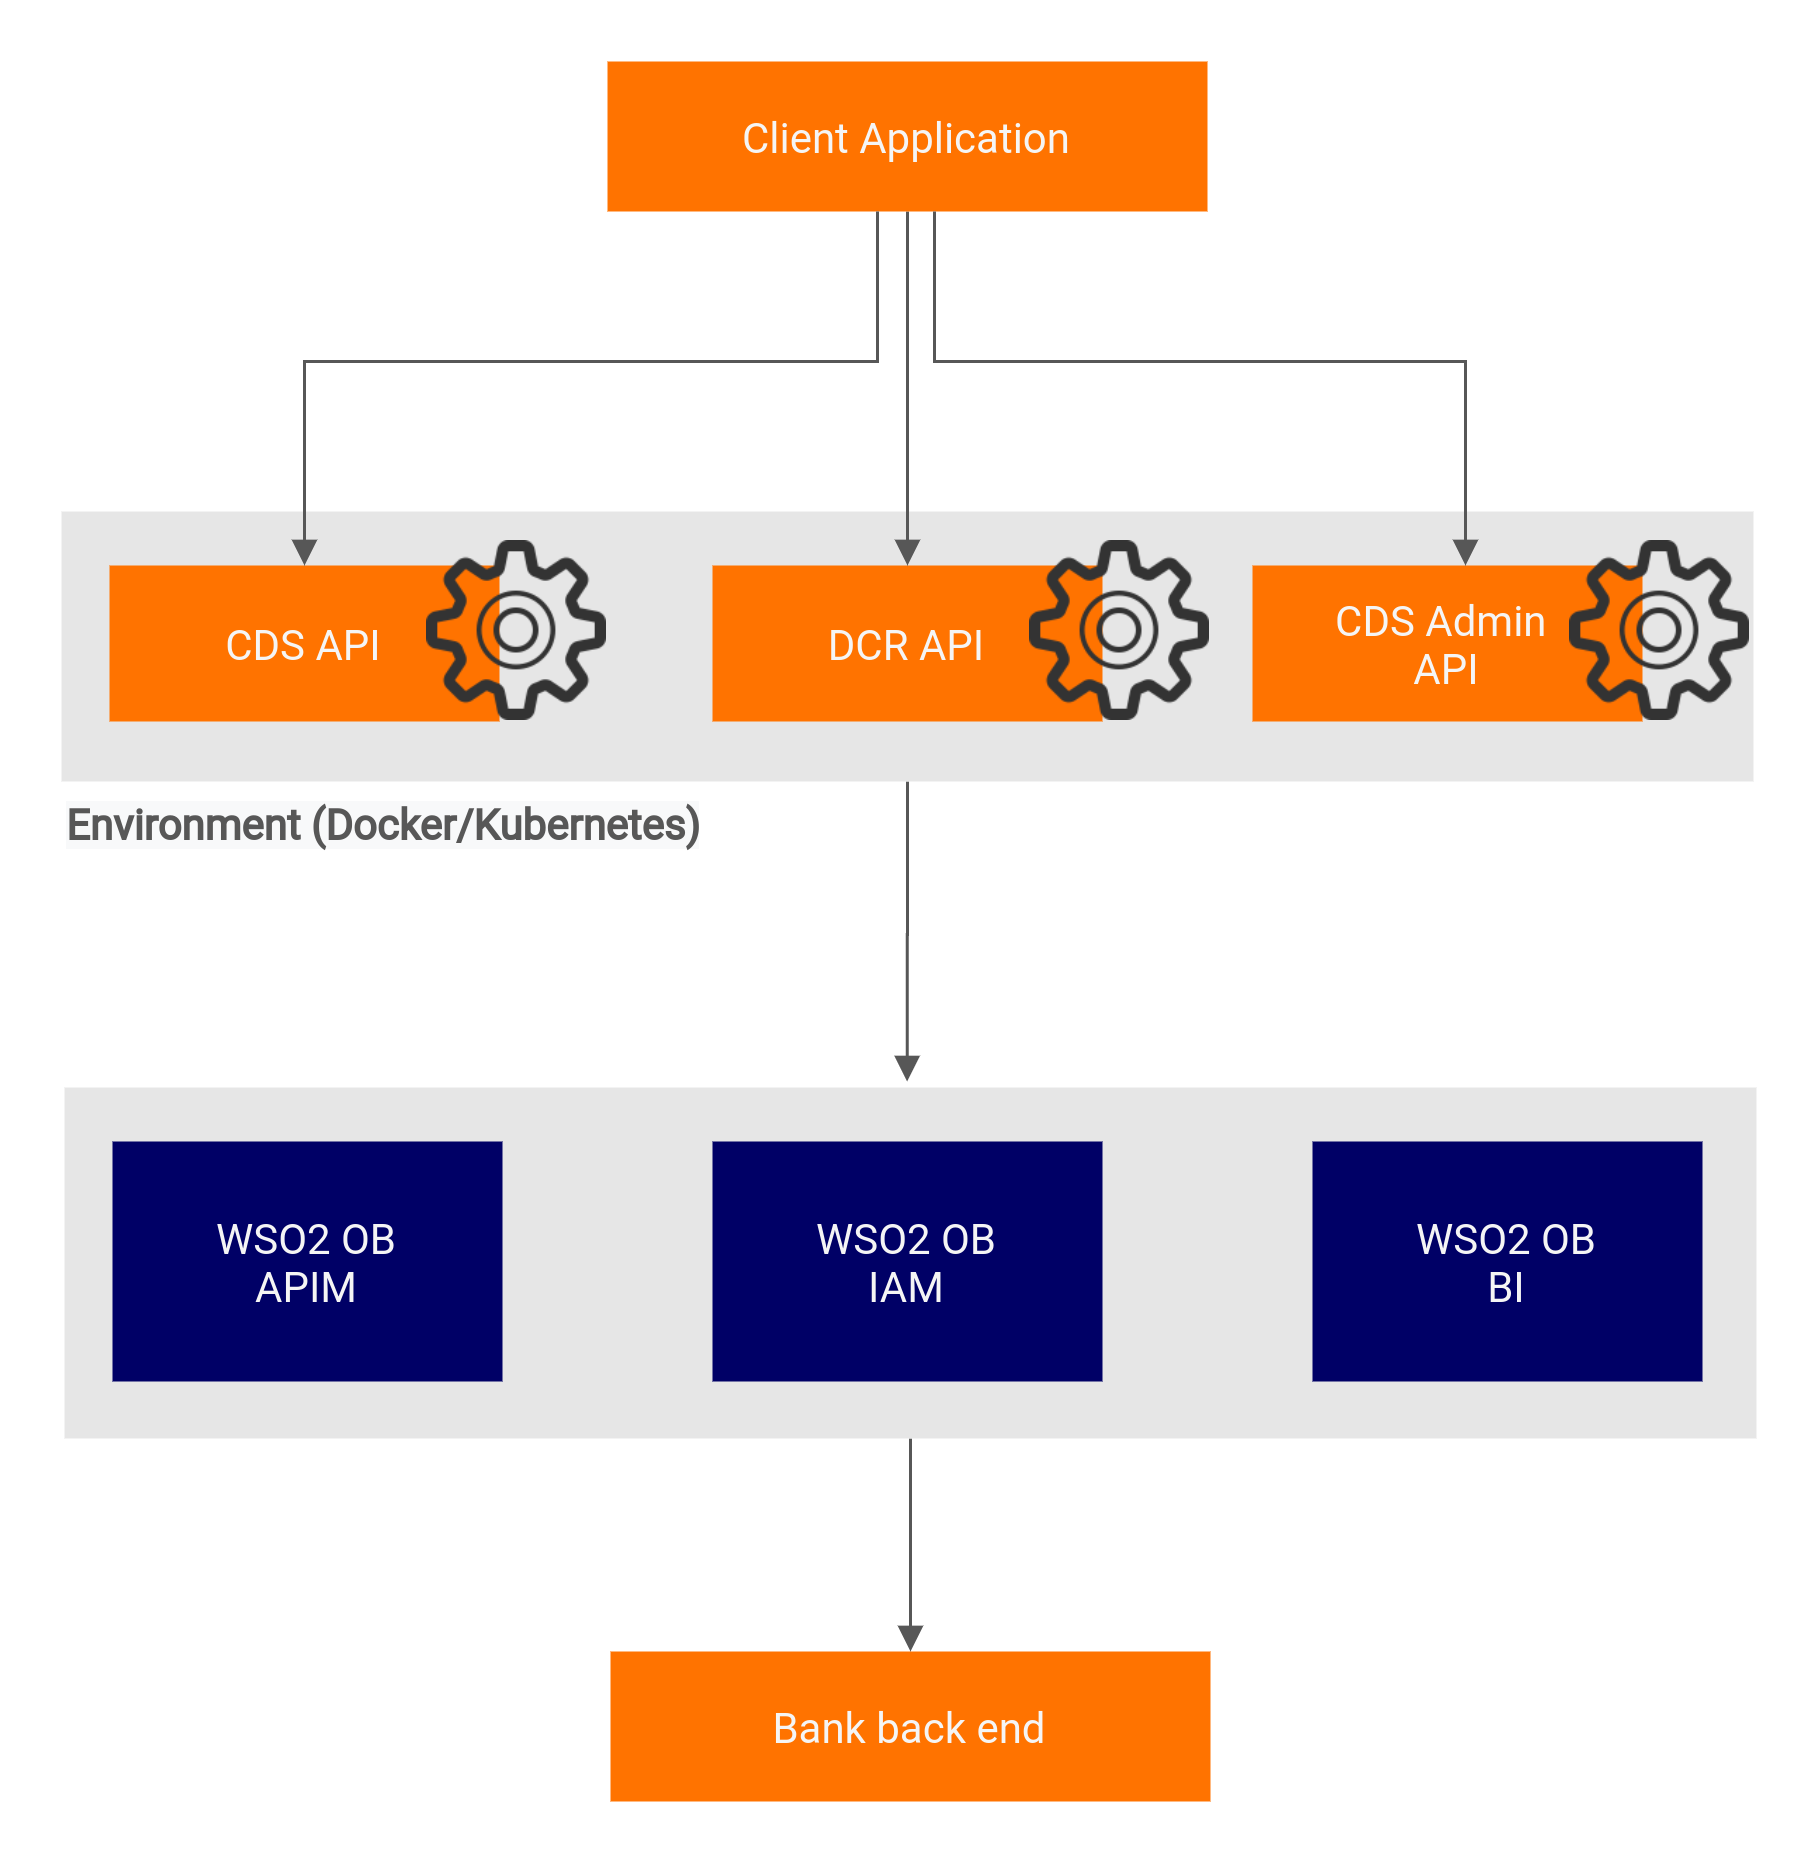
The API microgateways are placed as follows when placed in a deployment diagram.
Before you begin:
- Download and set up the WSO2 Open Banking 2.0 solution.
- Install and set up Docker in your servers.
Download Microgateway Docker images for WSO2 Open Banking Australia. WSO2 Open Banking contains Docker images for each API in the Consumer Data Standards (CDS) specification. The Docker images are available in the Docker Hub.
The following section explains how to try out the Consumer Data Standards API using WSO2 API Microgateway:
- Pull the Docker image for Consumer Data Standards API from the Docker registry.
Run the Docker image using the commands below:
For a sandbox environment, instead of
productionEndpoint_prod_endpoint_0, you can use this flag with the aboveruncommand:sandboxEndpoint_sand_endpoint_0=<SANDBOX_ENDPOINT_URL>
- All the configurations related to WSO2 API Microgateway and WSO2 Open Banking are available in the
micro-gw.conffile.Get the container Id of the Docker image with the API:
docker ps
Copy the
micro-gw.conffile from the Docker image to the host:docker cp <CONTAINER_ID>:/home/ballerina/conf/micro-gw.conf <DEST_PATH>
- Configure the
micro-gw.conffile: The microgateway is available in the port defined below, by default it's set to 9095:
[listenerConfig]
  httpsPort = 9095
Configure the hostname of your WSO2 Open Banking Identity and Access Manager server in the following configuration:
[keyManager]
  serverUrl = "https://<WSO2_OB_IAM_HOST>:9446"
Configure the hostname of your WSO2 Open Banking API Manager server in the following configuration:
[apiManager]
  serverUrl = "https://<WSO2_OB_APIM_HOST>:9443"
[openbanking.iam]
  serverUrl = "https://<WSO2_OB_IAM_HOST>:9446"
If the Admin APIs are being deployed using the Microgateway Docker image, update the below configurations based on the deployment:
Configure encryption/decryption key for ID permanence under the
[openbanking.au]tag. By default, the secret key value is "wso2".This is available only as a WUM update and is effective from March 24, 2021 (03-24-2021). For more information on updating WSO2 Open Banking, see Updating WSO2 Products.
[openbanking.au.id.permanence]
  secretKey = <SECRET_KEY>
To remove the Auth header from the authentication filter, set the following configuration to
true. For throttling purposes, set the value tofalse.This is available only as a WUM update and is effective from May 13, 2021 (05-13-2021). For more information on updating WSO2 Open Banking, see Updating WSO2 Products.
[authConfig]
  removeAuthHeaderFromOutMessage = false
For the Unattended traffic, 20 sessions per day, per customer, per data recipient policy
This is available only as a WSO2 Update and is effective from September 14, 2021 (09-14-2021). For more information on updating WSO2 Open Banking, see Updating WSO2 Products.
Add the following configuration to enable the policy:
[openbanking.au.unattendedSessionCountThrottling]
enable = true
To avoid sending the Auth header to the back end, add the following configuration under the
[openbanking]tag and set the value totrue.This is available only as a WUM update and is effective from May 13, 2021 (05-13-2021). For more information on updating WSO2 Open Banking, see Updating WSO2 Products.
This is only available for
wso2-obmg-au-cdsdocker images.[openbanking.authConfig] removeAuthHeaderFromOutMessage = true
Add custom filters using the following configuration:
[openbanking.au.filters]
  <FilterName>="Fully qualified class name"
You can configure filters; add custom filters and skip certain filters with the following configurations:
This is available only as a WUM update and is effective from May 18, 2021 (05-18-2021). For more information on updating WSO2 Open Banking, see Updating WSO2 Products.
Copy the updated
micro-gw.conffile to the Docker image:docker cp <PATH_TO_UPDATED_micro-gw.conf> <CONTAINER_ID>:/home/ballerina/conf/micro-gw.conf
- If you have a distributed deployment, exchange the certificates as explained in Setting Up Servers-Exchanging the certificates.
- Add any additional certificates to the client truststore of the Docker image:
Get the container Id of the Docker image with CDS API:
docker ps
Copy the
ballerinaTruststore.p12file from the Docker image to the host:docker cp <CONTAINER_ID>:/home/ballerina/wso2/runtime/bre/security/ballerinaTruststore.p12 <DEST_PATH>
Use the keytool commands and add the relevant certificates (regulatory certificates, server certificates) to the copied
ballerinaTruststore.p12file. The password to access the keystore isballerina.keytool -import -alias <CERT_ALIAS> -file <CERT_TO_ADD> -keystore ballerinaTruststore.p12 -storepass ballerina
Copy the updated client trustore to the Docker image:
docker cp <PATH_TO_UPDATED_ballerinaTruststore.p12> <CONTAINER_ID>:/home/ballerina/wso2/runtime/bre/security/ballerinaTruststore.p12
Run the Docker image using the commands below:
<PRODUCTION_ENDPOINT_URL>: Endpoint URL of the production server. For a sandbox environment, instead ofproductionEndpoint_prod_endpoint_0, use thesandboxEndpoint_sand_endpoint_0=<SANDBOX_ENDPOINT_URL>flag.<PROJECT_NAME>: Name of Docker image without the registry hostname.<PUBLISHED_PORT>: The port which the Docker image is exposed.<HTTPS_PORT>:httpsPortconfigured in the micro-gw.conf file.<WSO2_OB_SOLUTION_VERSION>: The version of the WSO2 Open Banking solution.To view logs:
Execute the command below:
Invoke the endpoints using the proper server hostname and port of your WSO2 API Microgateway (WSO2 API MG) server.
For example:
- When you are using the regular gateway -
https://<WSO2_OB_APIM_HOST>:8243/cds-au/v1/banking/accounts/ - When you are using WSO2 API Microgateway -
https://<WSO2_OB_API_MG>:9095/cds-au/v1/banking/accounts/
For more information on invoking the API, see Consumer Data Standards API v1.2.0.
- When you are using the regular gateway -