This site contains the documentation that is relevant to older WSO2 product versions and offerings.
For the latest WSO2 documentation, go to https://wso2.com/documentation/.
Configuring an Identity Provider
An Identity Provider (IdP) is responsible for issuing identification information and authenticating users by using security tokens like SAML 2.0. This is a favourable alternative to explicitly authenticating a user within a security realm.
The responsibility of the identity provider configuration is to represent external identity providers. These external identity providers can be Facebook, Yahoo, Google, Salesforce, Microsoft Windows Live, etc. If you want to authenticate users against these identity providers, then you must associate one or more federated authenticators with the WSO2 Identity Server. For example, if you want to authenticate users against Salesforce, then you must associate the SAML 2.0 authenticator with the Salesforce identity provider, if you want to authenticate users against Yahoo, then you must associate the OpenID authenticator with it. To make this process much easier, the Identity Server also comes with a set of more specific federated authenticators. For example, if you want authenticate against Facebook, you do not need to configure OAuth 2.0 authenticator. Instead you can directly use the Facebook federated authenticator.
Each identity provider configuration can also maintain a claim mapping. This is to map the identity provider's own set of claims to the Identity Server's claims. When the response from an external identity provider is received by the response processor component of the federated authenticator, before it hands over the control to the authentication framework, the response processor will create a name/value pair of user claims received in the response from the identity provider. These claims are specific to the external identity provider. Then it is the responsibility of the authentication framework to read the claim mapping configuration from the identity provider component and do the conversion. So, while inside the framework, all the user claim values will be in a common format.
So, in short, the WSO2 Identity Server allows you to add identity providers and specify various details that help you to link the identity provider to the Identity Server. So you must specify all information required to send the authentication requests and get a response back from the identity provider. This topic contains the following sections.
Adding an identity provider
Follow the instructions below to add a new identity provider.
- Sign in. Enter your username and password to log on to the Management Console.
- Navigate to the Main menu to access the Identity menu. Click Add under Identity Providers.
Fill in the details in the Basic Information section.

Note the following when filling the above form.Field Description Sample Value Identity Provider Name The Identity Provider Name must be unique as it is used as the primary identifier of the identity provider.
FacebookIdP Display Name The Display Name is used to identify the identity provider. If this is left blank, the Identity Provider Name is used. This is used in the login page when selecting the identity provider that you wish to use to log in to the service provider.
Facebook Description The Description is added in the list of identity providers to provide more information on what the identity provider is. This is particularly useful in situations where there are many identity providers configured and a description is required to differentiate and identify them. This is the identity provider configuration for Facebook. Federation Hub Identity Provider Select the Federation Hub Identity Provider checkbox to indicate if this points to an identity provider that acts as a federation hub. A federation hub is an identity provider that has multiple identity providers configured to it and can redirect users to the correct identity provider depending on their Home Realm Identifier or their Identity Provider Name. This can be specified in the login page.
Selected Home Realm Identifier The Home Realm Identifier value can be specified in each federated IDP and can send the Home Realm Identifier value as the “fidp” query parameter(ex:fidp=googleIdp) in the authentication request by the service provider. Then WSO2IS finds the IDP related to the “fidp” value and redirects the end user to the IDP directly rather than showing the SSO login page. By using this, you can avoid multi option, in a multi option scenario without redirect to the multi option page.
FB Identity Provider Public Certificate The Identity Provider Public Certificate is the public certificate belonging to the identity provider. Uploading this is necessary to authenticate the response from the identity provider. See Setting up Keystores for more information on how public keys work and how to sign these keys by a certification authority.
This can be any certificate. If the identity provider is another Identity Server, this can be a wso2.crt file.
Note: To create the Identity Provider Certificate, open your Command Line interface, traverse to the
<IS_HOME>/repository/resources/security/directory. Next you must execute the following command.keytool -export -alias wso2carbon -file wso2.crt -keystore wso2carbon.jks -storepass wso2carbon
Once this command is run, the wso2.crt file is generated and can be found in the
<IS_HOME>/repository/resources/security/directory. Click Choose File and navigate to this location in order to obtain and upload this file.See Setting up Keystores for more information.Alias The Alias is a value that has an equivalent value specified in the identity provider that we are configuring. This is required for authentication in some scenarios.
http://localhost:9443/oauth2/token About the federation hub and the home realm identifier
The federation hub has multiple identity providers configured to it. In a typical federation hub with multiple identity providers, each identity provider can have a unique home realm identifier that can be used to identify the identity provider you are logging into. So when a user logs in to the service provider's application, the authentication request is directed to the Identity Server. This Identity Server is configured as a service provider in the federation hub. When the request comes to the federation hub, it is sent to the identity provider that the user specifies. For instance, if the users prefer to use their Facebook credentials to log in, and Facebook is one of the identity providers configured in the federation hub, the user simply has to specify Facebook as the domain in the login screen.
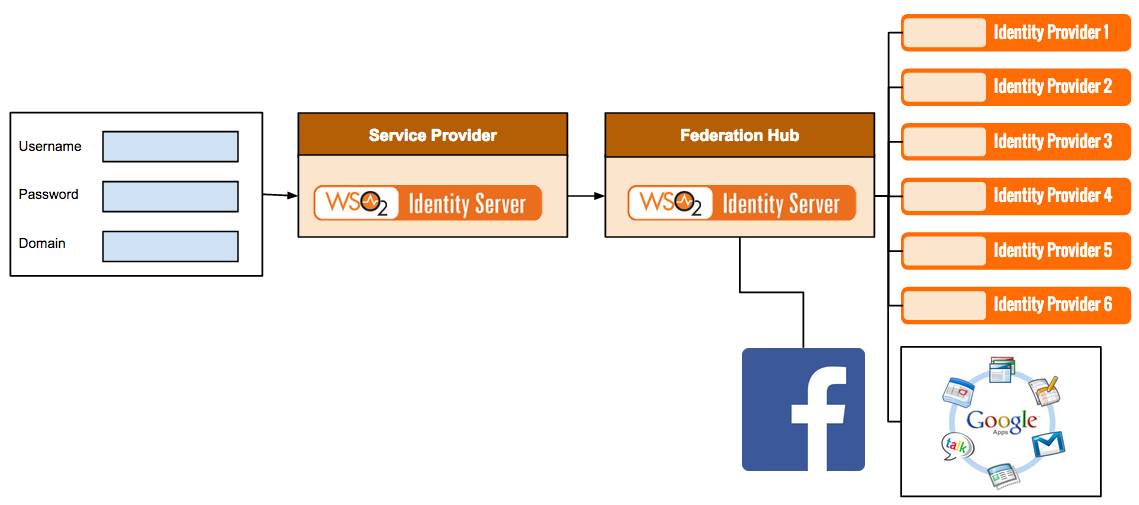
When the Home Realm Identifier is not specified, you can either select the domain name from a dropdown in the login page, or you have to enter the domain value in a separate page prior to logging in. This can be configured as explained below.
Open the
<IS_HOME>/repository/conf/security/application-authentication.xmlfile. TheProxyModeconfiguration allows the framework to operate in eithersmartmode ordumbmode. Insmartmode, both local and federated authentication is supported, while indumbmode, only federated authentication is supported. Ifdumbmode is configured here, you must provide the Home Realm Identifier, or you have to display a separate screen to the user to get it.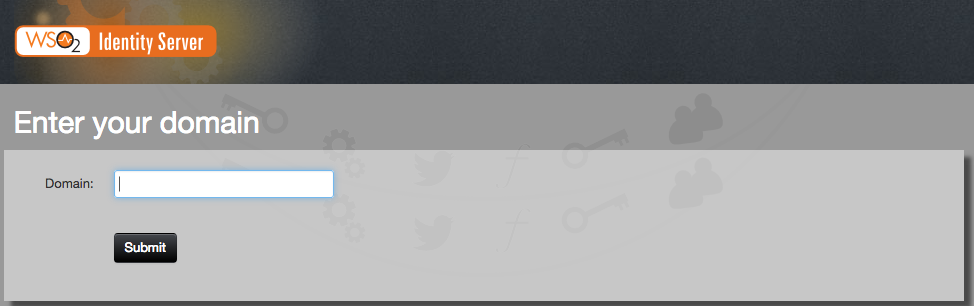
If smart mode is configured, the default behavior applies, where you can enter a local username and password, or use federated authenticators for authentication.
<ProxyMode>smart</ProxyMode>About the Alias
The Alias is used in the following authentication scenario.
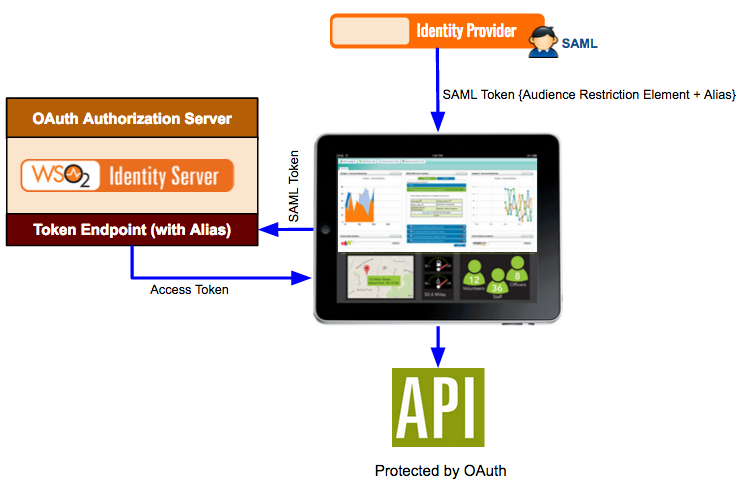
Here a SAML identity provider sends a SAML token to a web application for authentication. The SAML token has an audience restriction element that controls access and has a reference to the web application in order to access it. Using this token, the authentication takes place. Now, if the web application needs to access an API that is protected by OAuth 2.0, the same SAML token is sent to the token endpoint of the Identity Server. The Alias value you configure in the Identity Server is associated with this token endpoint. This alias value must be added to the audience restriction element of the SAML token. When this SAML token is sent to the Identity Server, you obtain an access token, which is used to access the API.
So in order to configure this, you must add the SAML identity provider as an identity provider in the Identity Server using the instructions in this topic. When configuring this in the Identity Server, you must specify the token alias for this scenario to work. This indicates that any token coming from the SAML identity provider must have this alias value in the audience restriction element.
- Enter the Identity Provider Name and provide a brief Description of the identity provider. Only Identity Provider Name is a required field.
Fill in the remaining details where applicable. Click the arrow buttons to expand the forms available to update.

Configuring claims for an identity provider involves mapping the claims available in the identity provider to claims that are local to the WSO2 Identity Server. This is done so that the Identity Server can identify the user attributes in the response sent from the identity provider. See the Identity Server Architecture topic for more information on how claim mapping fits into the identity provider scenario.
In the Claim Configuration form, there are two sub forms.
- Basic claim configuration - This involves a straightforward mapping of the claim that is used on the identity provider side with the claims local to the Identity Server.
- Advanced claim configuration - This involves more advanced mapping, where the mapped claims can have specific default values.
To view the claim configuration section, expand the Claim Configuration form.
Configuring basic claims
Select the claim mapping dialect by either choosing to use a local claim dialect (i.e., a claim dialect local to the Identity Server) or define your own custom claim dialect (i.e., a claim dialect which exists in the identity provider that must be mapped to the Identity Server).
- If you choose to Use Local Claim Dialect, select the claim you require from the User ID Claim URI dropdown that includes a list of all the claims defined in the Identity Server.

- You can alternatively choose the Define Custom Claim Dialect option.
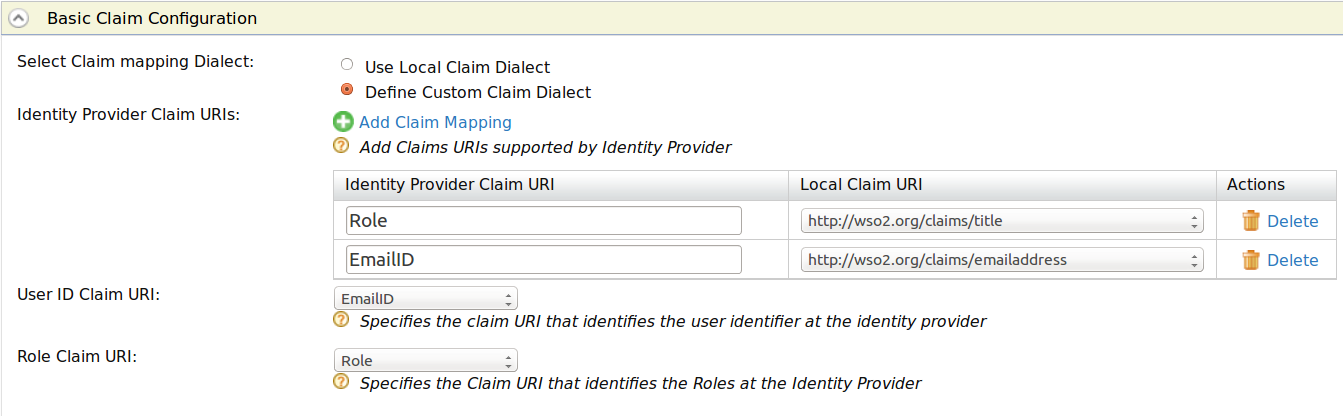
For custom claim dialects, you must map the attributes of the user in the identity provider to the claims that are local to the Identity Server. These claims can be part of the response that is sent from the identity provider to the Identity Server. This can also be used when provisioning users from the Identity Server to an external identity provider. These claim values are sent as part of the outbound provisioning request. Do the following to configure this.- Click the Add Claim Mapping button under Identity Provider Claim URIs. Clicking this button again enables you to perform more claim mapping.
- Map the value of the corresponding claim in the identity provider to the claim in the Identity Server. Click the Delete button to remove the claim mapping.

- Select the User ID Claim URI from the dropdown that includes the list of identity provider claims you defined. This is used to uniquely identify the user in the response sent by the identity provider. This is also used to identify the user in provisioning requests.
- Select the Role ID Claim URI from the dropdown that includes the list of identity provider claims you defined. This is used to uniquely identify the role of the user in the response sent by the identity provider. This is also used to identify the role in provisioning requests.
Configuring advanced claims
You can make advanced claim configurations based on the basic configurations you have made.
Provisioning scenario where advanced claims can be useful
The following scenario encompasses two different scenarios where provisioning happens. For both these scenarios, advanced claims are very useful.

In the above scenario, Google Apps is configured as an identity provider in the Identity Server and you would configure the Google provisioning connector for provisioning requests. When a user is added to the management console of the Identity Server, it is assumed in this scenario that the Identity Server acts as a resident service provider. This user is provisioned to Google Apps using the Google Apps identity provider configuration in the Identity Server. So when configuring claims for this scenario, we would have multiple local claim URIs associated to the user. For example, http://wso2.org/claims/emailaddress, http://wso2.org/claims/title, etc. From these claims, only some may be required to provision to Google Apps. This is where the Provisioning Claim Filter comes into play.
The next scenario is for Just-In-Time (JIT) provisioning. Salesforce is the service provider and Facebook is the identity provider configured in the Identity Server. When JIT provisioning is configured in the service provider configuration, the user is provisioned to the user store configured in the Identity Server. What happens here is that the authentication request is sent from Salesforce to the Identity Server, which sends it along to Facebook for authentication. Once authentication is done, the response is sent back to the Identity Server, and this is when JIT provisioning happens. So basically, JIT provisioning happens while in the middle of an authentication flow.
If the same user store is configured in the Google Apps identity provider configuration and JIT provisioning is enabled, the user is provisioned there as well. Once again, the Provisioning Claim Filter is vital to map only the required claims for the specific identity provider.
Note: The provisioning can happen in a blocking mode or in a non-blocking mode. In the blocking mode, the authentication flow will be blocked until the provisioning finishes - while in the non-blocking mode, provisioning happens in a different thread. This can be specified in the service provider configuration.
In both these scenarios, only some specific user attributes must be configured for provisioning as the claims are different for both Facebook and Google Apps and must be mapped to the claims in the Identity Server.
Use the following instructions to configure advanced claims.
- If you chose to Use Local Claim Dialect in the Basic Claim Configuration, do the following.
- When you send provisioning requests from the Identity Server to the external identity provider, it may not be necessary to send all the requests. So, you can use the Provisioning Claim Filter to filter out the user attributes you need to send from the other available attributes. To use the Provisioning Claim Filter, select the claims that exist in the Identity Server from the dropdown list and click Add Claim. Clicking this button again enables you to add a new entry.

- Enter a Default Value for your claim. This value is the default value used when provisioning this claim. This value will be used in all instances of this field, e.g., if all users are from one organization, you can specify the name of the organization as a default value using this field. Clicking the Delete button will remove this advanced claim.
- When you send provisioning requests from the Identity Server to the external identity provider, it may not be necessary to send all the requests. So, you can use the Provisioning Claim Filter to filter out the user attributes you need to send from the other available attributes. To use the Provisioning Claim Filter, select the claims that exist in the Identity Server from the dropdown list and click Add Claim. Clicking this button again enables you to add a new entry.
- If you chose to Define Custom Claim Dialect in the Basic Claim Configuration, do the following.
- Select the Identity Provider Claim URI you defined from the dropdown list and click Add Claim. Clicking this button again will add a new entry.

- Enter a Default Value for your claim. This value is the default value used when provisioning this claim. This value will be used in all instances of this field, e.g., if all users are from one organization, you can specify the name of the organization as a default value using this field. Clicking the Delete button will remove this advanced claim.
- Select the Identity Provider Claim URI you defined from the dropdown list and click Add Claim. Clicking this button again will add a new entry.
See the following topics for samples of claim mapping for an identity provider.
This section provides instructions on how to configure roles for an identity provider. Role mapping needs to be done because roles in the Identity Server are different to the roles available in the identity provider that you are configuring. For example, if you are configuring Google Apps as an identity provider in the Identity Server, the admin role in the Identity Server needs to be mapped to an appropriate role in Google Apps so that the user will have the same role in Google Apps and the Identity Server.
You can configure the roles of the identity provider by doing the following.
- Expand the Role Configuration section.
- To configure Identity Provider Roles, click Add Role Mapping. The following screen appears.

- Enter the Identity Provider Role and map it to the Local Role available in the Identity Server. See here for information on how the local role can be created in the Identity Server. Click the Delete button to remove the mapping.
- Enter the Identity Provider Provisioning Role. This configuration is very useful if you wish to only provision some users and not others. All users who are assigned to this role will be provisioned from the Identity Server to the identity provider. You can provision users that have multiple roles by specifying the roles in a comma separated list.

The responsibility of the federated authenticators is to authenticate the user with an external system. This can be with Facebook, Google, Yahoo, LinkedIn, Twitter, Salesforce or any other identity provider. Federated authenticators are decoupled from the Inbound Authenticators. Once the initial request is handed over to the authentication framework from an inbound authenticator, the authentication framework talks to the service provider configuration component to find the set of federated authenticators registered with the service provider corresponding to the current authentication request.
A federated authenticator has no value unless it is associated with an identity provider. For example, the Identity Server supports SAML 2.0, OpenID, OpenID Connect, OAuth 2.0 and WS-Federation (passive). The SAML 2 .0 federated authenticator itself has no value, it has to be associated with an identity provider. Google Apps can be an identity provider with the SAML 2.0 federated authenticator. This federated authenticator knows how to generate a SAML request to the Google Apps and process a SAML response from it.
There are two parts in a federated authenticator.
- Request Builder
- Response Processor
Once the federation authentication is successfully completed, the federated authenticator notifies the authentication framework. The framework can now decide that no more authentication is required and hand over the control to the corresponding response builder of the inbound authenticator. Both the request builder and the response processor are protocol aware, while the authentication framework is not coupled to any protocol. See Architecture for more information on this overall process.
To configure federated authentication with different protocols see the following topics.
- Configuring OpenID
- Configuring SAML 2.0 Web SSO
- Configuring OAuth2/OpenID Connect
- Configuring WS-Federation (Passive)
- Configuring Facebook
- Configuring Yahoo
- Configuring Google
- Configuring Microsoft Windows Live
You can configure Just-In-Time (JIT) provisioning for the identity provider. With Just-in-Time provisioning, you can create users on the fly without having to create user accounts in advance. For example, if you recently added a user to your application, you do not need to manually create the user in the Identity Server or in the underlying user store.
When the users are authenticated as part of the authentication flow, their account is automatically created for them, eliminating the time and effort related to creating the account. So when the response from the identity provider comes into the Identity Server, and if JIT provisioning is enabled, the user is provisioned to the user store in the Identity Server. You can specify the user store to which the provisioning happens.
Expand the Just-In-Time Provisioning section to configure this.

- Selecting No provisioning from the available options disables Just-In-Time provisioning. This is selected by default.
- Alternatively you could choose to always provision users to the user store domain. Select the user store domain name from the dropdown list to provision users to the user store. The default user store that is shipped with the Identity Server is the user store available by default. You can configure a user store of your preference and it will be listed in this dropdown for selection.
You can configure the WSO2 Identity Server to provision users to external applications. See the Identity Server Architecture for more information on how this process fits into the overall picture
You can configure outbound provisioning connectors by expanding the relevant section.
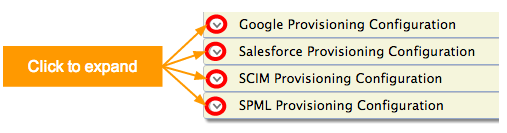
In addition to this, you can also create custom connectors that are added to the list of outbound provisioning connectors once created.
Configuring Google provisioning
This configuration involves setting up the Identity Server to send provisioning requests to Google applications.
Expand the Google Provisioning Configuration form.
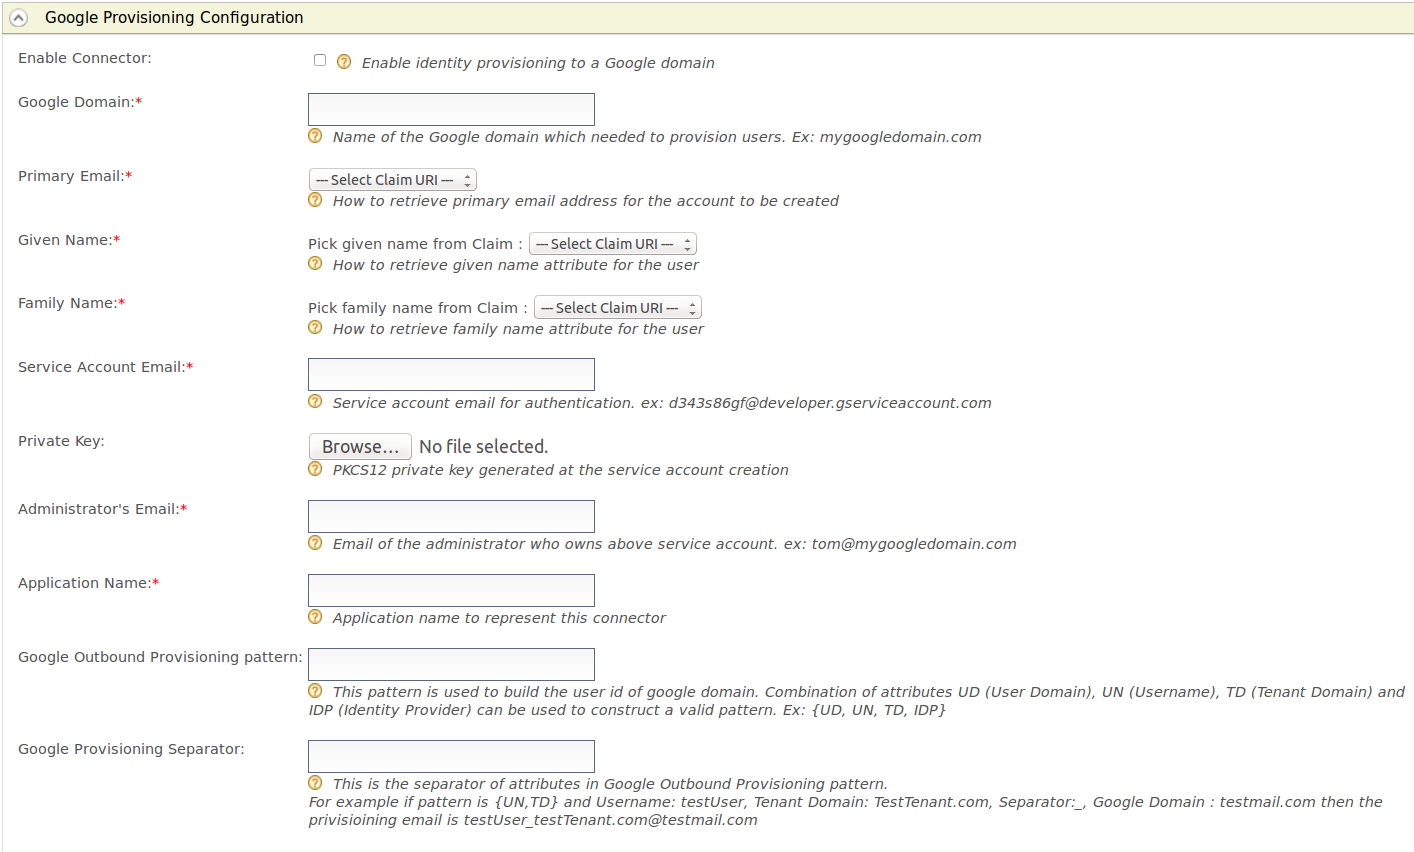
Fill in the following fields where relevant.Field Description Sample value Enable Connector Selecting this enables identity provisioning through the Google domain. Selected Google Domain The name of the Google domain used to provision users. mygoogledomain.com Primary Email Claim URI which will be used to retrieve primary email address for the account to be created. This must be a claim that is available and local in the Identity Server. http://wso2.org/claims/emailaddress Given Name Claim URI which will be used to retrieve given name attribute for the user. This must be a claim that is available and local in the Identity Server. http://wso2.org/claims/givenname Family Name Claim URI which will be used to retrieve family name attribute for the user. This must be a claim that is available and local in the Identity Server. http://wso2.org/claims/lastname Service Account Email This email is used for authentication purposes. d343s86gf@developer.gserviceaccount.com Private Key Browse and attach the private key from your local machine. This is the PKCS12 private key generated at the service account creation <uploaded_file> Administrator's Email This is the email of the administrator who owns the service account in the Google Domain specified. Provisioning takes place using this email, so specifying this here serves as a means for authentication. om@mygoogledomain.com Application Name This is the name of the application which is used to represent the Google connector. Domain Google Outbound Provisioning pattern This pattern is used to build the user id of Google domain. Combination of attributes UD (User Domain), UN (Username), TD (Tenant Domain) and IDP (Identity Provider) can be used to construct a valid pattern.
This is a way to differentiate following scenarios:
If there are several tenants and you must configure Google outbound provisioning for same Google domain in those tenants.
If there are several user stores and you must configure the specific user store that needs to be provisioned.
If there are multiple identity providers configured for same Google domain.{UD, UN, TD, IDP} Google Provisioning Separator This is used to separate the values that you configure in the Google Outbound Provisioning pattern. For this, it is better to use a character that is not normally used in the user domain/username/tenant domain/idp name. For example: "_"
Configuring Salesforce provisioning
This configuration involves setting up the Identity Server to send provisioning requests to Salesforce. See Outbound Provisioning with Salesforce for more information on how this is configured from end to end.
- Expand the Salesforce Provisioning Configuration form.
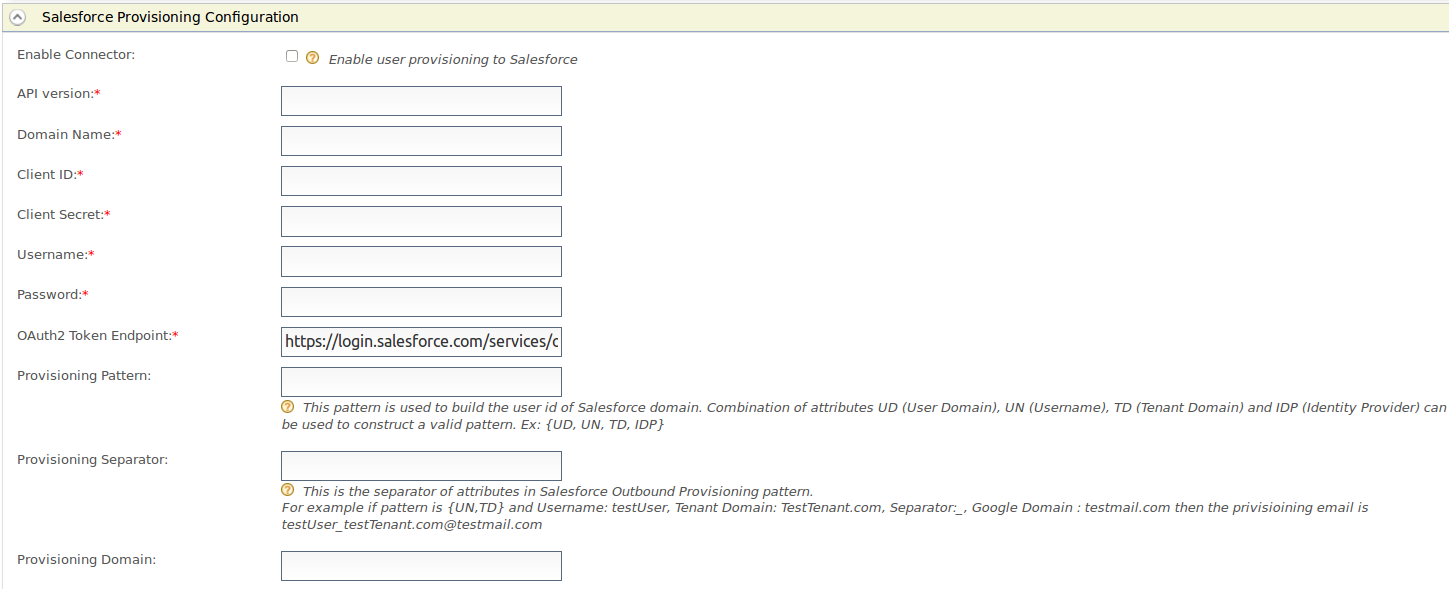
Fill in the following fields where relevant.
Field Description Sample value Enable Connector Selecting this enables identity provisioning through Salesforce. Selected API version This is the version of the Salesforce API that is used for provisioning. To obtain this, log into https://developer.salesforce.com/ and clickSetup. On the left navigation pane, click API under Develop. Generate one of those APIs to check the version. v32.0 Domain Name This is the name of the Salesforce domain used to provision users. If you do not have a Salesforce domain, you can create a domain by logging into https://developer.salesforce.com/ and clicking Setup. On the left navigation pane, click My Domain under Domain Management. Make sure you enter the domain with an HTTPS prefix so that it resembles a URL. https://identityprovisioning-dev-ed.my.salesforce.com/ Client ID This is the username of the client you are using to access Salesforce. This Consumer Key value is obtained when configuring Salesforce. See Outbound Provisioning with Salesforce for more information. 3MVG8123wefw763na2452683KJNsvrgKBwe4gyksKJ22f3g45 Client Secret This is the password of the client you are using to access Salesforce. This Consumer Secret value is obtained when configuring Salesforce. See Outbound Provisioning with Salesforce for more information. <password> Username This is the Salesforce username. samuel@wso2.com Password This is the Salesforce password and must be entered along with the security token. So you would enter this in the following format: <password><security_token> <password><security_token> OAuth2 Token Endpoint OAuth token endpoint URL of Salesforce.
https://login.salesforce.com/services/oauth2/token Provisioning Pattern This pattern is used to build the user id of Salesforce domain. Combination of attributes UD (User Domain), UN (Username), TD (Tenant Domain) and IDP (Identity Provider) can be used to construct a valid pattern.
This is a way to differentiate following scenarios:
If there are several tenants and you must configure Salesforce outbound provisioning for same Salesforce domain in those tenants.
If there are several user stores and you must configure the specific user store that needs to be provisioned.
If there are multiple identity providers configured for same Salesforce domain.{UD, UN, TD, IDP} Provisioning Separator This is used to separate the values that you configure in the Salesforce Outbound Provisioning pattern. For this, it is better to use a character that is not normally used in the user domain/username/tenant domain/idp name. For example: "_" Provisioning Domain The user name of Salesforce is an email address. Here you can configure a specific domain name the username should have. yahoo.com About claim configuration for Salesforce
The following claims must be configured when configuring Salesforce for outbound provisioning. See Outbound Provisioning with Salesforce for more information on how to do this.
- EmailEncodingKey
- LanguageLocaleKey
- LastName
- LocaleSidKey
- ProfileId
- TimeZoneSidKey
- Username
- UserPermissionsCallCenterAutoLogin
- UserPermissionsMarketingUser
- UserPermissionsOfflineUser
Configuring SCIM provisioning
The System for Cross-domain Identity Management (SCIM) specification is designed to make managing user identities in the WSO2 Identity Server easier. Identity provisioning is a key aspect of any identity management solution and, as such, is very relevant to SCIM. In simple terms, it is to create, maintain and delete user accounts and related identities in one or more systems or applications in response to business processes that are initiated either by humans directly or by automated tasks.
This configuration involves setting up the Identity Server to send provisioning requests to an external application that supports SCIM. See Outbound Provisioning with SCIM for more information on how this works in a typical scenario.
Expand the SCIM Provisioning Configuration form.

Fill in the following fields where relevant.Field Description Sample value Enable Connector Selecting this enables identity provisioning through SCIM. Selected Username This is the username of the SCIM application. Admin Password This is the password of the SCIM application. <password> User Endpoint This is the SCIM endpoint of the users. https://localhost:9443/wso2/scim/Users Group Endpoint This is the SCIM endpoint of the groups. https://localhost:9443/wso2/scim/Groups User Store Domain This is the user store that users are created. You can specify any user store connected to your identity provider. Domain Enable Password Provisioning This is to specify whether to send a default password, or the password sent in the SCIM request, to the server where it gets provisioned. In a scenario where the Identity Server is used as a proxy, and sending the password to some other server is not appropriate, the default password can be sent. Selected Default The default password that must be sent. <password>
Configuring SPML provisioning
The Service Provisioning Markup Language (SPML) is the open standard for the integration and interoperation of service provisioning requests. The goal of SPML is to allow organizations to securely and quickly set up user interfaces for Web services and applications, by letting enterprise platforms such as Web portals, application servers, and service centers generate provisioning requests within and across organizations
This configuration involves setting up the Identity Server to send provisioning requests to an external application that supports SPML. See Outbound Provisioning with SPML for more information on how this works in a typical scenario.
- Expand the SPML Provisioning Configuration form.
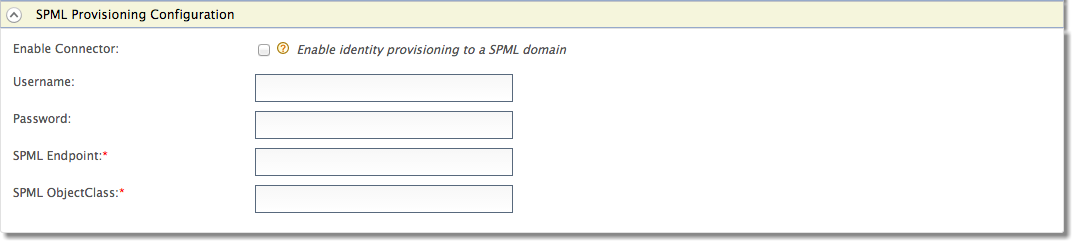
Fill in the following fields where relevant.
Field Description Sample value Enable Connector Selecting this enables identity provisioning through SPML. Selected Username This is the username of the SPML application. Configadmin Password This is the password of the SPML application. <password> SPML Endpoint This is the SPML endpoint URL. http://localhost:9847/servelet/spml SPML ObjectClass The ObjectClass for SPML. This value is required as it links with the ObjectClass in SPML that is used to provide data from the user store. spml2person
Related Topics- See Outbound Provisioning for more information on configuring user stores and service providers for outbound provisioning.
- Click Register to add the Identity Provider.
Configuring a resident identity provider
WSO2 Identity Server can mediate authentication requests between service providers and identity providers. At the same time, the Identity Server itself can act as a service provider and an identity provider. When it acts as an identity provider it is known as the resident identity provider.
The resident identity provider configuration is very relevant for you if you are a service provider and want to send an authentication request or a provisioning request to the Identity Server (say via SAML, OpenID, OpenID Connect, SCIM, and WS-Trust). See Configuring WS-Trust STS for an example of how resident identity provider is used to implement security token service.
Resident identity provider configuration is a one time configuration for a given tenant. It basically shows you the Identity Server's metadata, like the endpoints. In addition to the metadata, you can configure this if you want to secure the WS-Trust endpoint with a security policy.
Follow the instructions below to configure a resident identity provider.
- Sign in. Enter your username and password to log on to the Management Console.
In the Main menu under the Identity section, click List under Identity Providers. The list of identity providers you added appears.
Click the Resident Identity Provider link.
The Resident Identity Provider page appears.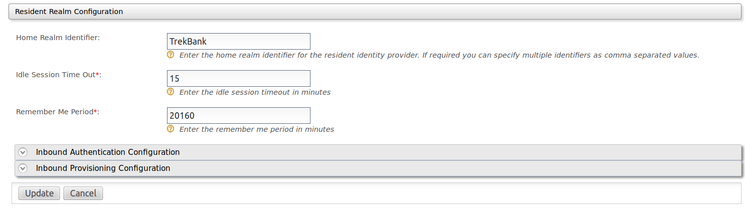
Enter a Home Realm Identifier for the resident identity provider. You can enter multiple identifiers as a comma separated list.This value is essentially the domain name of the identity provider. If you do not enter a value here, when an authentication request comes to the Identity Server, a page is displayed prompting the user to specify a domain.
Idle Session Time Out : This represents the idle session time out for SSO sessions. The default value is set to 15min which means that if Identity Server does not receive any SSO authentication request for 15min for a given user SSO session would be timeout. You can configure the idle time out value.
Remember Me Period : You can tick on the Remember Me option in Identity Server login page if you need to make remember the SSO session. You can define an expiry time for this remembrance period by configuring Remember Me Period. This is configurable and the default time is 2 weeks.
- Configure inbound authentication if required. This is not mandatory for creating a resident identity provider.
Set the Identity Provider Entity Id under SAML2 Web SSO Configuration. Specifying this gives the tenant identification, so any users provisioned through this tenant can be identified as such.
Configure the WS-Trust/WS-Federation (Passive). You can configure this if you want to secure the WS-Trust endpoint with a security policy.

- Click Update.
- Click Ok to the confirmation message that appears.
Note the following information regarding the URLs on this screen.
You can modify the host name of these URLs by changing the value in the <IS_HOME>/repository/conf/carbon.xml file using the following configuration.
<HostName>localhost</HostName>
Once you update the host name in the carbon.xml file, change the URL to reflect the new host name in the <IS_HOME>/repository/conf/identity/identity.xml file.
<IdentityProviderURL>https://localhost:9443/samlsso</IdentityProviderURL>
The above URL is used for destination validation of the SAML request. The Identity Server compares the value of the "destination" inside the SAML request with the URL in the above configuration. This is done to ensure that the correct application is communicating with the right identity provider.
- OpenID Server URL: https://localhost:9443/openid
- SSO URL: https://localhost:9443/samlsso
- Logout URL: https://localhost:9443/samlsso
- Authorization Endpoint URL: https://localhost:9443/oauth2/authz
- Token Endpoint URL: https://localhost:9443/oauth2/token
- User Info Endpoint URL: https://localhost:9443/oauth2/token
- SCIM User Endpoint: https://localhost:9443/wso2/scim/Users
- SCIM Group Endpoint: https://localhost:9443/wso2/scim/Groups
Managing identity providers
This section provides instructions on how to manage identity providers once they are created.
Viewing identity providers
Follow the instructions below to view the list of identity providers added in the WSO2 Identity Server.
- Sign in. Enter your username and password to log on to the Management Console.
- In the Main menu under the Identity section, click List under Identity Providers. The list of identity providers you added appears.

Editing identity providers
Follow the instructions below to edit an identity provider's details.
- Sign in. Enter your username and password to log on to the Management Console.
- In the Main menu under the Identity section, click List under Identity Providers. The list of identity providers you added appears.
- Locate the identity provider you want to edit and click on the corresponding Edit link.

- You are directed to the edit screen where you can modify the details you configured for the identity provider.
Deleting identity providers
Follow the instructions below to delete an identity provider.
- Sign in. Enter your username and password to log on to the Management Console.
- In the Main menu under the Identity section, click List under Identity Providers. The list of identity providers you added appears.
- Locate the identity provider you want to delete and click on the corresponding Delete link.

- Confirm your request in the WSO2 Carbon window. Click the Yes button.
Disabling/Enabling identity providers
Follow the instructions below to disable or enable an identity provider.
- Sign in. Enter your username and password to log on to the Management Console.
- In the Main menu under the Identity section, click List under Identity Providers. The list of identity providers you added appears.
- Locate the identity provider you want to delete and click on the corresponding Disable link to disable the identity provider. Clicking this link will change the link to Enable. To enable the identity provider again, click the Enable link.

- Click Ok on the confirmation form that appears when clicking Disable/Enable.
See the following topics for information on configuring service providers using different specifications.
- See Identity Federation for information on configuring federated authenticators.
See the following topics to configure different applications as service providers in Identity Server.