This site contains the documentation that is relevant to older WSO2 product versions and offerings.
For the latest WSO2 documentation, go to https://wso2.com/documentation/.
Configuring Outbound Provisioning Connectors for an Identity Provider
You can configure the WSO2 Identity Server to provision users to external applications. See the Identity Server Architecture for more information on how this process fits into the overall picture
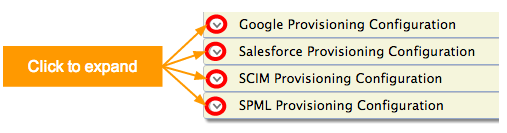
You can configure outbound provisioning connectors by expanding the relevant section.
In addition to this, you can also create custom connectors that are added to the list of outbound provisioning connectors once created.
Configuring Google provisioning
This configuration involves setting up the Identity Server to send provisioning requests to Google applications.
Expand the Google Provisioning Configuration form.
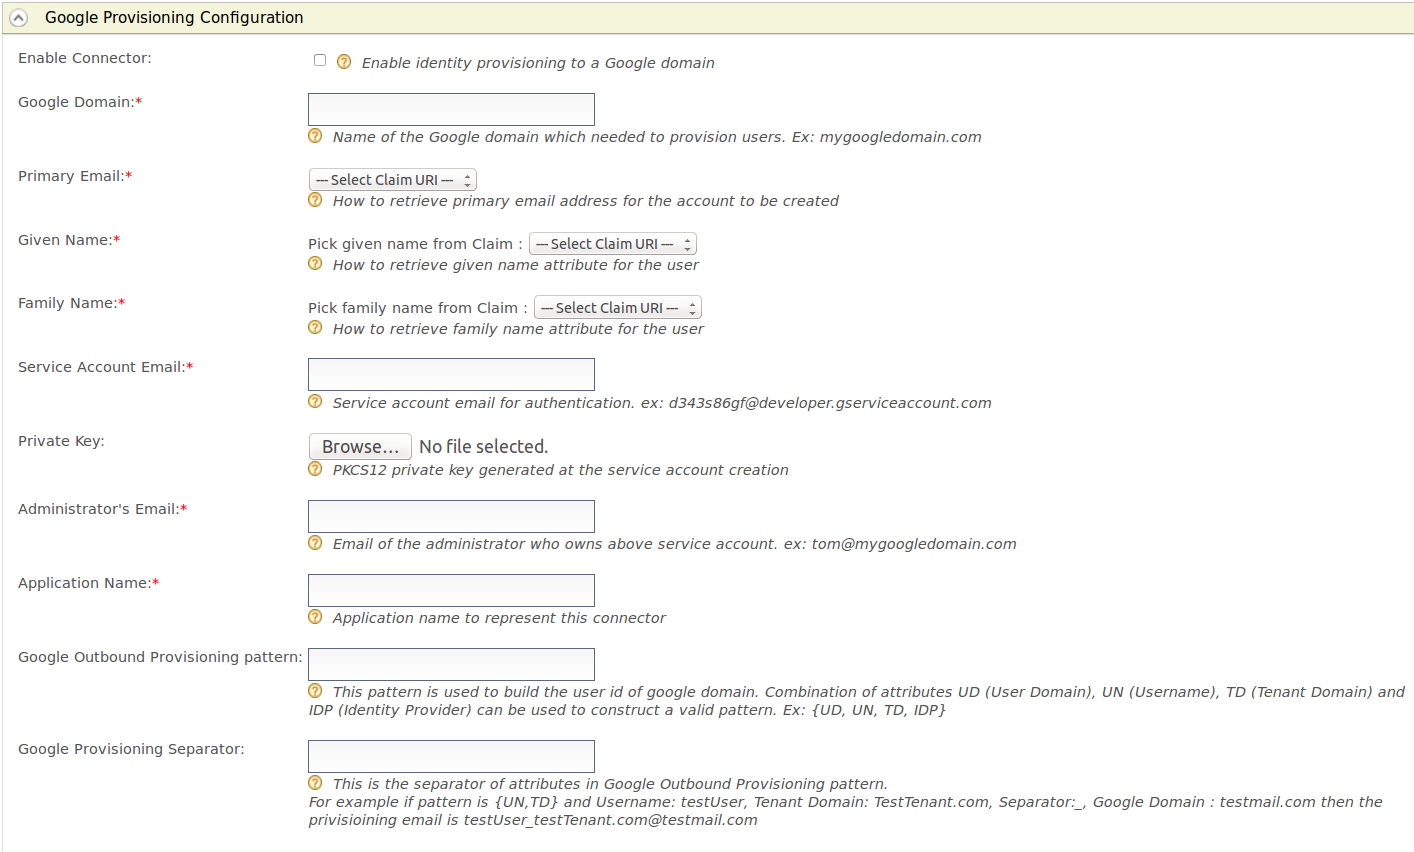
Fill in the following fields where relevant.Field Description Sample value Enable Connector Selecting this enables identity provisioning through the Google domain. Selected Google Domain The name of the Google domain used to provision users. mygoogledomain.com Primary Email Claim URI which will be used to retrieve primary email address for the account to be created. This must be a claim that is available and local in the Identity Server. http://wso2.org/claims/emailaddress Given Name Claim URI which will be used to retrieve given name attribute for the user. This must be a claim that is available and local in the Identity Server. http://wso2.org/claims/givenname Family Name Claim URI which will be used to retrieve family name attribute for the user. This must be a claim that is available and local in the Identity Server. http://wso2.org/claims/lastname Service Account Email This email is used for authentication purposes. d343s86gf@developer.gserviceaccount.com Private Key Browse and attach the private key from your local machine. This is the PKCS12 private key generated at the service account creation <uploaded_file> Administrator's Email This is the email of the administrator who owns the service account in the Google Domain specified. Provisioning takes place using this email, so specifying this here serves as a means for authentication. om@mygoogledomain.com Application Name This is the name of the application which is used to represent the Google connector. Domain Google Outbound Provisioning pattern This pattern is used to build the user id of Google domain. Combination of attributes UD (User Domain), UN (Username), TD (Tenant Domain) and IDP (Identity Provider) can be used to construct a valid pattern.
This is a way to differentiate following scenarios:
If there are several tenants and you must configure Google outbound provisioning for same Google domain in those tenants.
If there are several user stores and you must configure the specific user store that needs to be provisioned.
If there are multiple identity providers configured for same Google domain.{UD, UN, TD, IDP} Google Provisioning Separator This is used to separate the values that you configure in the Google Outbound Provisioning pattern. For this, it is better to use a character that is not normally used in the user domain/username/tenant domain/idp name. For example: "_"
Configuring Salesforce provisioning
This configuration involves setting up the Identity Server to send provisioning requests to Salesforce. See Outbound Provisioning with Salesforce for more information on how this is configured from end to end.
- Expand the Salesforce Provisioning Configuration form.
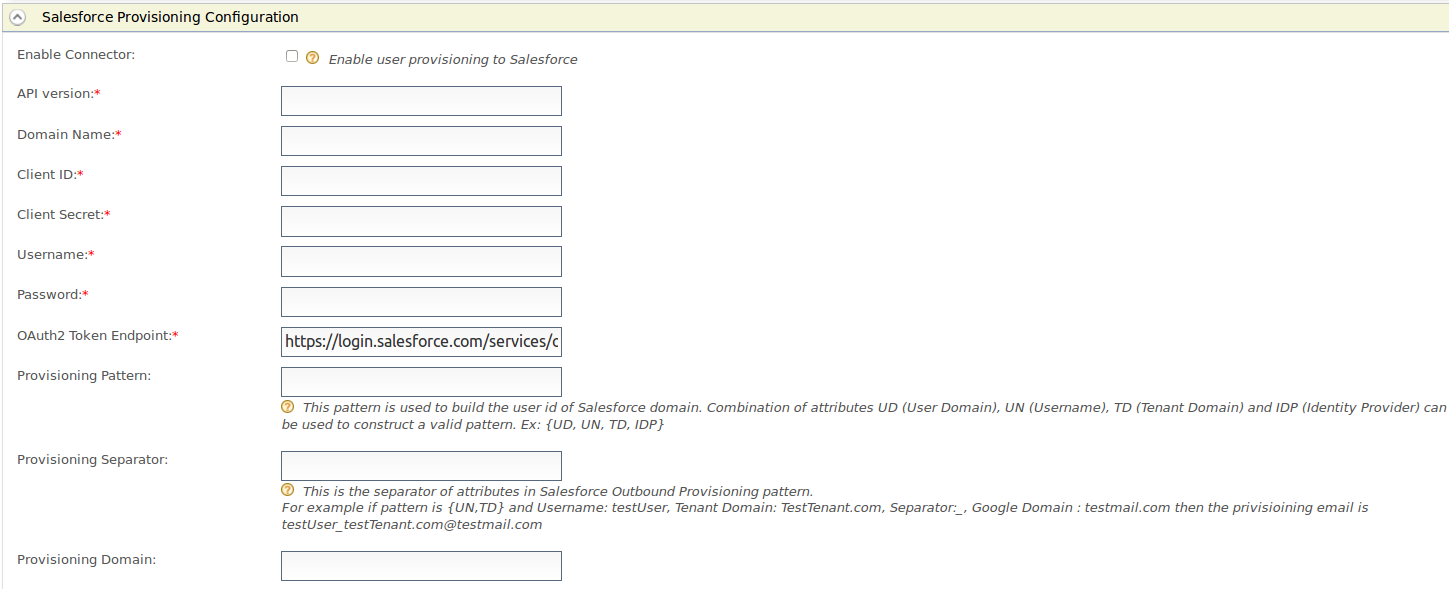
Fill in the following fields where relevant.
Field Description Sample value Enable Connector Selecting this enables identity provisioning through Salesforce. Selected API version This is the version of the Salesforce API that is used for provisioning. To obtain this, log into https://developer.salesforce.com/ and clickSetup. On the left navigation pane, click API under Develop. Generate one of those APIs to check the version. v32.0 Domain Name This is the name of the Salesforce domain used to provision users. If you do not have a Salesforce domain, you can create a domain by logging into https://developer.salesforce.com/ and clicking Setup. On the left navigation pane, click My Domain under Domain Management. Make sure you enter the domain with an HTTPS prefix so that it resembles a URL. https://identityprovisioning-dev-ed.my.salesforce.com/ Client ID This is the username of the client you are using to access Salesforce. This Consumer Key value is obtained when configuring Salesforce. See Outbound Provisioning with Salesforce for more information. 3MVG8123wefw763na2452683KJNsvrgKBwe4gyksKJ22f3g45 Client Secret This is the password of the client you are using to access Salesforce. This Consumer Secret value is obtained when configuring Salesforce. See Outbound Provisioning with Salesforce for more information. <password> Username This is the Salesforce username. samuel@wso2.com Password This is the Salesforce password and must be entered along with the security token. So you would enter this in the following format: <password><security_token> <password><security_token> OAuth2 Token Endpoint OAuth token endpoint URL of Salesforce.
https://login.salesforce.com/services/oauth2/token Provisioning Pattern This pattern is used to build the user id of Salesforce domain. Combination of attributes UD (User Domain), UN (Username), TD (Tenant Domain) and IDP (Identity Provider) can be used to construct a valid pattern.
This is a way to differentiate following scenarios:
If there are several tenants and you must configure Salesforce outbound provisioning for same Salesforce domain in those tenants.
If there are several user stores and you must configure the specific user store that needs to be provisioned.
If there are multiple identity providers configured for same Salesforce domain.{UD, UN, TD, IDP} Provisioning Separator This is used to separate the values that you configure in the Salesforce Outbound Provisioning pattern. For this, it is better to use a character that is not normally used in the user domain/username/tenant domain/idp name. For example: "_" Provisioning Domain The user name of Salesforce is an email address. Here you can configure a specific domain name the username should have. yahoo.com About claim configuration for Salesforce
The following claims must be configured when configuring Salesforce for outbound provisioning. See Outbound Provisioning with Salesforce for more information on how to do this.
- EmailEncodingKey
- LanguageLocaleKey
- LastName
- LocaleSidKey
- ProfileId
- TimeZoneSidKey
- Username
- UserPermissionsCallCenterAutoLogin
- UserPermissionsMarketingUser
- UserPermissionsOfflineUser
Configuring SCIM provisioning
The System for Cross-domain Identity Management (SCIM) specification is designed to make managing user identities in the WSO2 Identity Server easier. Identity provisioning is a key aspect of any identity management solution and, as such, is very relevant to SCIM. In simple terms, it is to create, maintain and delete user accounts and related identities in one or more systems or applications in response to business processes that are initiated either by humans directly or by automated tasks.
This configuration involves setting up the Identity Server to send provisioning requests to an external application that supports SCIM. See Outbound Provisioning with SCIM for more information on how this works in a typical scenario.
Expand the SCIM Provisioning Configuration form.

Fill in the following fields where relevant.Field Description Sample value Enable Connector Selecting this enables identity provisioning through SCIM. Selected Username This is the username of the SCIM application. Admin Password This is the password of the SCIM application. <password> User Endpoint This is the SCIM endpoint of the users. https://localhost:9443/wso2/scim/Users Group Endpoint This is the SCIM endpoint of the groups. https://localhost:9443/wso2/scim/Groups User Store Domain This is the user store that users are created. You can specify any user store connected to your identity provider. Domain Enable Password Provisioning This is to specify whether to send a default password, or the password sent in the SCIM request, to the server where it gets provisioned. In a scenario where the Identity Server is used as a proxy, and sending the password to some other server is not appropriate, the default password can be sent. Selected Default The default password that must be sent. <password>
Configuring SPML provisioning
The Service Provisioning Markup Language (SPML) is the open standard for the integration and interoperation of service provisioning requests. The goal of SPML is to allow organizations to securely and quickly set up user interfaces for Web services and applications, by letting enterprise platforms such as Web portals, application servers, and service centers generate provisioning requests within and across organizations
This configuration involves setting up the Identity Server to send provisioning requests to an external application that supports SPML. See Outbound Provisioning with SPML for more information on how this works in a typical scenario.
- Expand the SPML Provisioning Configuration form.
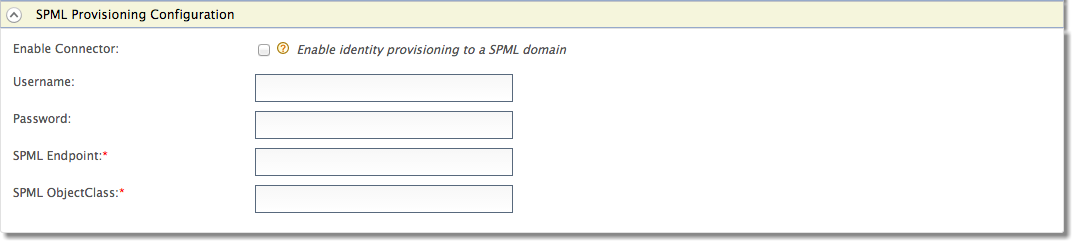
Fill in the following fields where relevant.
Field Description Sample value Enable Connector Selecting this enables identity provisioning through SPML. Selected Username This is the username of the SPML application. Configadmin Password This is the password of the SPML application. <password> SPML Endpoint This is the SPML endpoint URL. http://localhost:9847/servelet/spml SPML ObjectClass The ObjectClass for SPML. This value is required as it links with the ObjectClass in SPML that is used to provide data from the user store. spml2person
- See Outbound Provisioning for more information on configuring user stores and service providers for outbound provisioning.