The content in this documentation is for older versions of WSO2 products. For updated information on Enterprise Integration Patterns, go to the latest Micro Integrator documentation.
Content Filter
- Former user (Deleted)
- Former user (Deleted)
- Former user (Deleted)
This section explains, through an example scenario, how the Content Filter EIP can be implemented using WSO2 ESB. The following topics are covered:
Introduction to Content Filter
The Content Filter EIP helps manage a large message when you are interested in a few data items only. It removes unimportant data items from a message and leaves only the important ones. In addition to removing data elements, Content Filter can be used to simplify a message structure. For more information, refer to http://www.eaipatterns.com/ContentFilter.html.

Figure 1: Content Filter EIP
Example scenario
This example scenario explains how a message's content can be optimized to gain a more productive response. A client sends a stock quote request containing additional data that is not necessary for message processing. WSO2 ESB uses an XSLT mediator to restructure the request message and optimize it with only the required data before sending it to the Stock Quote service. This approach improves performance, as removing unnecessary bits of data makes the message more lightweight.
The diagram below depicts how to simulate the example scenario in WSO2 ESB.
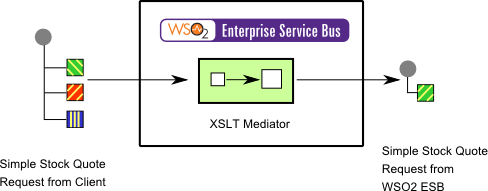
Figure 2: Example Scenario of the Content Filter EIP
Before digging into implementation details, let's take a look at the relationship between the example scenario and the Content Filter EIP by comparing their core components.
| Content Filter EIP (Figure 1) | Content Filter Example Scenario (Figure 2) |
|---|---|
| Original Message | Simple Stock Quote Request from Client |
| Content Filter | XSLT Mediator |
| Filtered Message | Simple Stock Quote Request from WSO2 ESB |
Environment setup
- Download and install WSO2 ESB from http://wso2.com/products/enterprise-service-bus. For a list of prerequisites and step-by-step installation instructions, refer to Installation Guide in the WSO2 ESB documentation.
- Start the sample Axis2 server. For instructions, refer to the section Setting Up the ESB Samples - Starting the Axis2 server in the WSO2 ESB documentation.
Save the following XSLT document as
<ESB_HOME>/repository/samples/resources/transform/split_message.xslt.<?xml version="1.0" encoding="ISO-8859-1"?> <xsl:stylesheet version="2.0" xmlns:xsl="http://www.w3.org/1999/XSL/Transform" xmlns:fn="http://www.w3.org/2005/02/xpath-functions" xmlns:m0="http://services.samples" exclude-result-prefixes="m0 fn"> <xsl:output method="xml" omit-xml-declaration="yes" indent="yes"/> <xsl:template match="/"> <m:getQuote xmlns:m="http://services.samples"> <m:request> <m:symbol> <xsl:value-of select="//m0:getQuote/m0:request[1]"/> </m:symbol> </m:request> </m:getQuote> </xsl:template> </xsl:stylesheet>
ESB configuration
Start the ESB server and log into its management console UI (https://localhost:9443/carbon). In the management console, navigate to the Main menu and click Source View in the Service Bus section. Next, copy and paste the following configuration, which helps you explore the example scenario, to the source view.
<!-- Content Filter -->
<definitions xmlns="http://ws.apache.org/ns/synapse">
    <registry provider="org.wso2.carbon.mediation.registry.ESBRegistry">
        <parameter name="root">file:./repository/samples/resources/</parameter>
        <parameter name="cachableDuration">15000</parameter>
    </registry>
    <!-- define the request processing XSLT resource as a static URL source -->
    <localEntry key="filter_data" src="file:repository/samples/resources/transform/split_message.xslt"/>
      <proxy name="ContentFilterProxy">
        <target>
        <inSequence>
             <xslt key="filter_data"/>
             <log level="full" />
             <send>
                <endpoint>
                    <address uri="http://localhost:9000/services/SimpleStockQuoteService"/>
                </endpoint>
             </send>
        </inSequence>
        <outSequence>
            <log level="full" />
                <send />
        </outSequence>
      </target>
    <publishWSDL uri="file:repository/samples/resources/proxy/sample_proxy_1.wsdl"/>
   </proxy>
</definitions>
Simulating the sample scenario
Send the following request to the ESB using a SOAP client like SoapUI.
<soapenv:Envelope xmlns:soapenv="http://schemas.xmlsoap.org/soap/envelope/" xmlns:ser="http://services.samples" xmlns:xsd="http://services.samples/xsd">
   <soapenv:Header/>
   <soapenv:Body>
      <ser:getQuote>
         <!--Optional:-->
         <ser:request>
            <!--Optional:-->
            <ser:symbol>1</ser:symbol>
         </ser:request>
          <ser:request>
            <!--Optional:-->
            <ser:symbol>2</ser:symbol>
         </ser:request>
         <ser:request>
            <!--Optional:-->
            <ser:symbol>3</ser:symbol>
         </ser:request>
      </ser:getQuote>
   </soapenv:Body>
</soapenv:Envelope>
When a request arrives to the ESB, it is first simplified to the following structure using the XSLT mediator. You can use TCPMon to observe this behavior.
<soapenv:Envelope xmlns:soapenv="http://schemas.xmlsoap.org/soap/envelope/" xmlns:ser="http://services.samples" xmlns:xsd="http://services.samples/xsd">
   <soapenv:Header/>
   <soapenv:Body>
      <ser:getQuote>
         <ser:request>
            <ser:symbol>1</ser:symbol>
         </ser:request>
       </ser:getQuote>
   </soapenv:Body>
</soapenv:Envelope>
How the implementation works
Let's investigate the elements of the ESB configuration in detail. The line numbers below are mapped with the ESB configuration shown above.
- localEntry [line 8 in ESB config] - Entry from the local registry.
- xslt [line 12 in ESB config] - The XSLT mediator applies an XSLT transformation to the selected element in the message specified using the
sourceattribute. In this case, no source attribute is given, so the transformation will be applied to the first child element of the message.