The content in this documentation is for older versions of WSO2 products. For updated information on Enterprise Integration Patterns, go to the latest Micro Integrator documentation.
Channel Purger
This section explains, through an example scenario, how the Channel Purger EIP can be implemented using WSO2 ESB. The following topics are covered:
Introduction to Channel Purger
The Channel Purger EIP removes unwanted messages, which can disturb tests or running systems, from a channel. Channel Purger is also useful when you need to reset a messaging system to a consistent state. For more information, refer to http://www.eaipatterns.com/ChannelPurger.html.
Figure 1: Channel Purger EIP
Example scenario
This example scenario is a stock quote service, and we send several stock quote requests to a message store to fill it. We then demonstrate how a user can delete left-over messages in a particular store through the management console UI of WSO2 ESB.
The diagram below depicts how to simulate the example scenario using the WSO2 ESB.
Figure 2: Example Scenario of the Channel Purger EIP
Before digging into implementation details, let's take a look at the relationship between the example scenario and the Channel Purger EIP by comparing their core components.
| Channel Purger EIP (Figure 1) | Channel Purger Example Scenario (Figure 2) |
|---|---|
| Messages | Simple Stock Quote Requests |
| Channel | Message Store |
| Channel Purger | WSO2 ESB Management Console |
Environment setup
- Download and install the WSO2 ESB from http://wso2.com/products/enterprise-service-bus. For a list of prerequisites and step-by-step installation instructions, refer to Getting Started in the WSO2 ESB documentation.
- Start the sample Axis2 server. For instructions, refer to the section ESB Samples Setup - Starting Sample Back-End Services in the WSO2 ESB documentation.
ESB configuration
Start the ESB server and log into its management console UI (
https://localhost:9443/carbon). In the management console, navigate to the Main menu and click Source View in the Service Bus section. Next, copy and paste the following configuration, which helps you explore the example scenario, to the source view.<definitions xmlns="http://ws.apache.org/ns/synapse"> <sequence name="fault"> <log level="full"> <property name="MESSAGE" value="Executing default "fault" sequence"/> <property name="ERROR_CODE" expression="get-property('ERROR_CODE')"/> <property name="ERROR_MESSAGE" expression="get-property('ERROR_MESSAGE')"/> </log> <drop/> </sequence> <sequence name="main"> <store messageStore="PurgedData"/> </sequence> <messageStore name="PurgedData"/> </definitions>- Send several stock quote requests to the message store using the following command.
ant stockquote -Dtrpurl=http://localhost:8280/ -Dsymbol=foo
Simulating the sample scenario
Now that the message store is filled with several requests, let's delete some of them using the ESB management console.
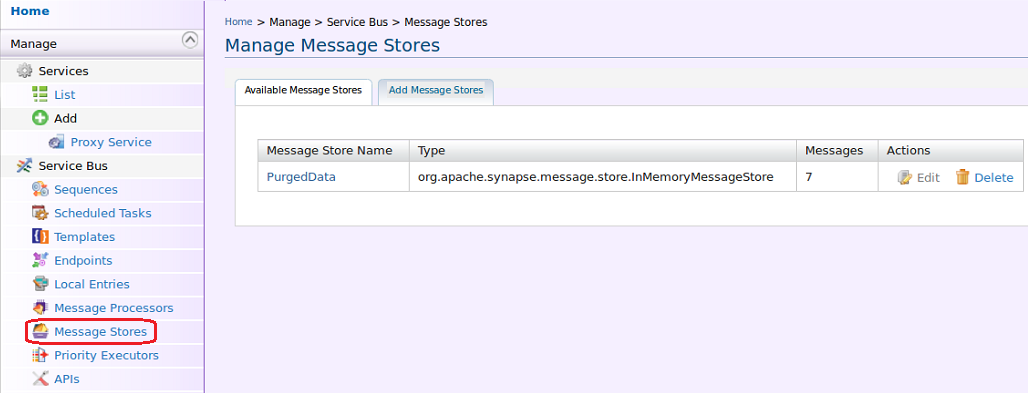
- Open the management console UI, click the Main menu and then Service Bus. Next, click the Message Stores sub menu. This will open the Manage Message Stores window.
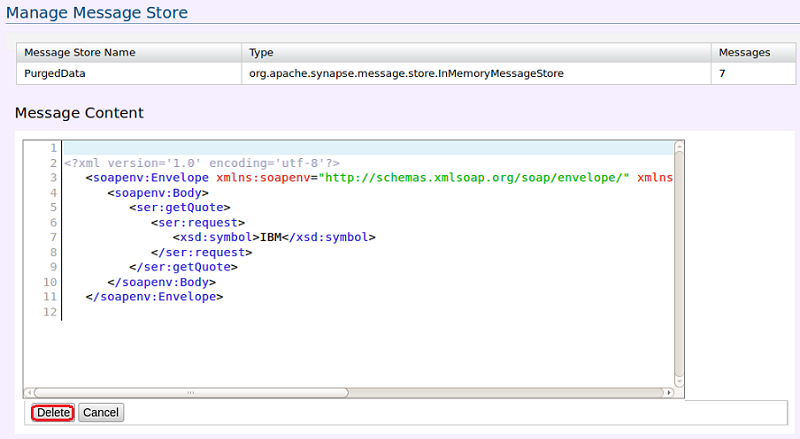
- Click the PurgedData option in the store. You will see the list of messages sent earlier. Click Show Envelope to view the message.
- Click Delete to delete individual messages or Delete All to delete all messages at once.
How the implementation works
- Sequence [line 10 in ESB config] - The main sequence is the default sequence for WSO2 ESB.
- Store [line 11 in ESB config] - The Store mediator stores messages in the given message store.
- messageStore [line 13 in ESB config] - Defines a new message store with the name
PurgedData. Message purging steps are given above in the section Simulating the Sample Scenario.


